Create and configure archives
Proceed as follows when archiving data:
- Check which database you are using (see useValueArchive)
- Create an archive: see Create archive
- Configure the archive: see Configure archive
- Create the archive configs for your data points, see Assigning data point elements to archives.
- Start the archiving: see Start archiving.
- Back up the data: see Swap out/backup archives
- Check the status of the archive: see Archive status
useValueArchive
The History database is used for the value archiving. Alarms can further be archived in the RAIMA database. Note that values archived in the RAIMA cannot be exported into the ValueArchive.
Using the RAIMA database for data archiving is not supported anymore. The RAIMA database can archive only historical alarm information. This means that this config entry must not be set to 0.
When a query to the ValueArchive manager leads to an error message (i.e. no data is sent back to the client but an error message), memory is not released and memory usage of the DATA manager is increased.
When updating a project, the exported data sets are not updated. The archive sets are converted automatically when they are imported to the system later. Note that this only applies to the alarm archive sets of the RAIMA database!
Before being used, the History DB must be configured accordingly (see data archiving and internal Archive DPs).
Create archive
To be able to archive the data with the History DB, the following settings have to be made. In VISION, theDatabase configurationbutton of theDatabasetab in the system management opens theFile selectionpanel.
The Database configuration button only exists if you use the History DB. With the RAIMA database, the button is called Data Manager (see System management).
You can also open the following panel with the command line option -p para/archive/archive_select.pnl:
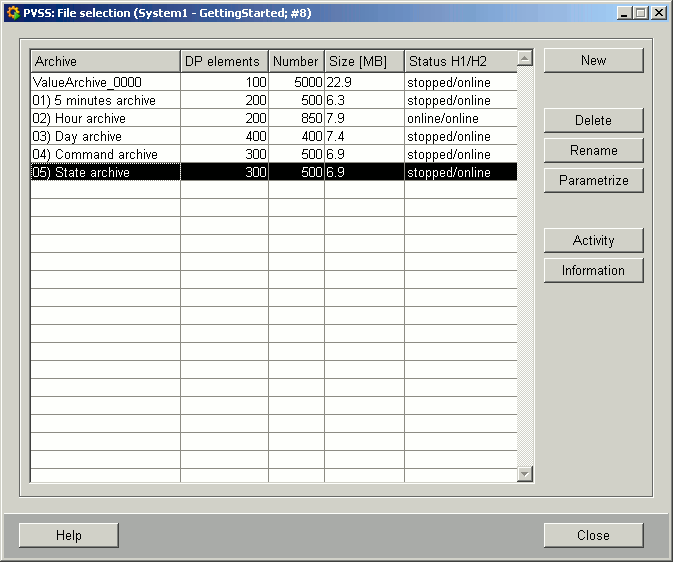
The table of the panel shows the following entries:
- The name of the archive
- The number of maximum data point elements per archive record (see History DB configuration)
- Number of maximum values per archive record (Elements, History DB configuration)
- Expected maximum size of the archive record
- Status (stopped, deleted or online). The status online is triggered by the start of the archiving (see Start archiving). If the project is redundant, two backups H1 and H2 are displayed next to the status field.
By default, 6 archives have already been created. Each archive can save one hundred data point elements and an extension is possible if required. The internal data points are saved in ValueArchive_0000. The following table shows the default settings of the History DB.
| Archive | Number of DPE's | Number of tuples | Pre assigned | Number of archives | Switchtime (days) | un-saved | Size /file | Max. size [MB] |
|---|---|---|---|---|---|---|---|---|
| ValueArchive_0000 | 300 | 500 | 33 | 3 | 0 | all | 6,9 | 20,7 |
| 5 minutes archive | 200 | 500 | 2 | 14 | 1 | 7 | 6,3 | 88,2 |
| Hour archive | 200 | 850 | 13 | 12 | 31 | 2 | 7,9 | 94,8 |
| Day archive | 400 | 500 | 47 | 10 | 366 | 2 | 7,4 | 74 |
| Command archive | 300 | 500 | 25 | 3 | - | all | 6,9 | 20,7 |
| State archive | 300 | 500 | 104 | 3 | - | all | 6,9 | 20,7 |
New
The New... button opens a dialog where you enter a name for your archive.

Click OK to confirm the entry. This creates a DP _ValueArchive_<num>. No archive will be created if Cancel is clicked. By default, 10 archives 0-9 (_ValueArchive_0 to _ValueArchive_9) are created as well as the DP _ValueArchive_<num>_2 for redundant systems.
It is seriously recommended to configure these archive data points through the panels provided and not directly with the corresponding PARA panel.
A message reminds you to configure the archive before you start the archiving process in the console.
Rename
Select Rename to assign, for example, the name "Weekly".
Delete
If you select Delete, the archive will be deleted from the panel but the data is retained. A confirmation to delete the archive is required. Only the archive status will be changed, the actual archive data will not be deleted.
Configure
The Configure button opens the History data base configuration panel, where you can set the parameters.
Activity
The Activity button opens the History DB Action panel (change archive record, backup, delete, ...)
Information
The Information button opens a status window that informs you about the status of the data record such as change, deletion or compression.
The archives are located in <proj_path>db/wincc_oa/VA_*. To delete archive definitively, in addition to the deletion process (see above), all the files in this directory must also be removed.
Close
Select Close to leave the panel.Help
Help opens the corresponding page of the online help.Configure archive
- Select a line in the File selection panel.
- Click on Configure.
The History data base configuration panel comprises the 5 tabs Size, Time, Statistics, Backup H1 (for redundant systems also the Backup H2 tab is visible) and Special options.
Size
The expected record size should not exceed 2048 MB, otherwise a warning will be shown.
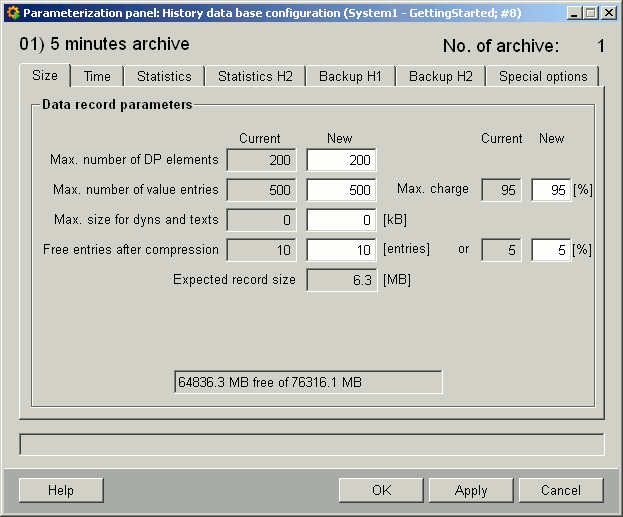
This tab allows you to define the size of the archive record (Data record parameters).
- To enter a value click the particular field. For compression, backup and deletion (in each case) 9999 archive sets can be configured.
- A dialog that allows specifying the possible range opens.
Figure 4. Number of elements dialog 
- Enter the required size in the input field and confirm with OK, or exit the dialog with Cancel.
- Maximum number of DP elements (by default, the value 100 is suggested)
- Maximum number of value entries (by default, the value 5000 is suggested)
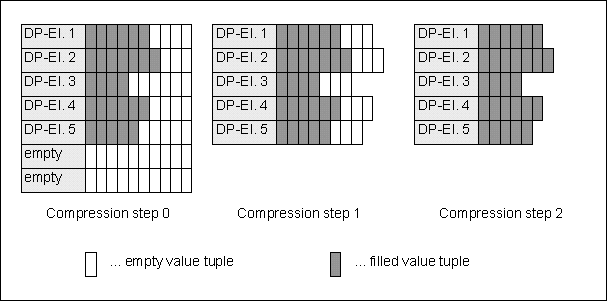
- Maximum size for dyns and texts (by default 0): That is, for values of variable size. Normally, entries are integers or floating values. If additional dyns or texts are archived, an additional size limit can be specified. The value 0 means no restriction.
- Free entries after compression: Defines the number of free value entries per DPE for compression level 1 (see History DB - Compression of archives). This value can be specified with a fixed number (by default 0, the value range of this configuration is based on the defined maximum number of value entries) and percentage dependent on the already written values (by default 5%) or both. If both fields are used, the larger value is valid.
- Expected record size : This is derived from the entries above.
Max. charge: This defines how full the current archive record can be (by default, a fill level of 95% is suggested). The fill level enables subsequent correction values to be written to an archive record. The maximum level can be given within the limits of [-1..95]%. The program sets a fill level > 95% to 95%, a level of < 95% will be accepted. The fill level is configured for the maximum amount of value entries. During a file record change, the values from the buffer will be written in the new or the old file record, depending on their source time. A buffer is also required for redundant systems in order to change the archive record synchronously.
The text field (read only) that displays the disk space used is visible only when the data point _DiskSpaceCheck has an entry in the element Device (for example, C:/) (see Monitoring hard disks).
By changing an archived DP element assignment from one archive to another archive and back again (e.g.A1 -> A2 -> A1 -> A2), consider to perform at least one archive record change of the archive that was assigned at first (A1). Assign a DP element to the archive A1 first after this archive record change. This is necessary since the archives only contain DP element assignments per archive record.
When specifying the free tuples per DPE after compression in the level 1, you can configure a value that eventually exceeds the maximum fill level of the archive. So the archive can "grow" after compression. For example, Configuration of 20% free value entries after compression, activating the automatic compression. If the archive will now be filled evenly to 95% per DPE, the archive record will be changed and the archive will be increased to 114% due to the automatic compression.
If a maximum fill level of -1 has been set, the archive record will not be changed when the archive is full. This, however, requires the reliable prevention of the archive from being full, by time-controlled change of archive records (see Change archive record). Otherwise, data may be lost.
- Select OK to save the entries and return to File selection.
- Select Apply to save without leaving the panel.
- Select Cancel to exit the panel without saving the data.
- Select Help to open this page of the online help.
These buttons have the same functions in all the tabs.
Time
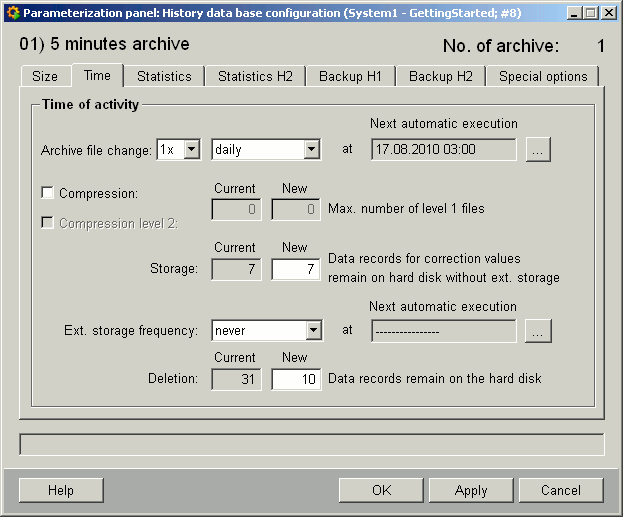
The time is the "local" time. The time is converted internally to the UTC time and the file sets of the archive contain the UTC file change time in the file name. On this tab, you define the times at which archive records are automatically changed(a new archive record will be started), saved (archive record will be backed up) or deleted. See Swap out/backup archives. If you select the type daily, you can additionally choose how many times the archive will be changed per day (1-24).
The specified time is the absolute system time so that the offset to UTC changes for summer and wintertime. Therefore, the file sets contain different time identifiers and the time content of the file sets can cover either 24, 23 and 25 hours (in case of a daily change).
The time of execution should not be same as the execution time of the online backup.
- How often the archive record has to be changed can be selected from the combo box.
Take into account that in redundant systems the file switches must be made in a defined cyclic interval (see the option "Archive file change" above). Otherwise you will probably loose data if the file names on the servers are not the same.
- The ... button opens the dialog for specifying the time. The default is midnight (00.00) in each case.
Figure 6. File Change Time Dialog 
- Enter the required time and confirm with OK.
- The current automatic time of the action is displayed. The new values will not be applied until this time has been reached.
The time of the swap-out should not be the same as the time of the OnlineBackup.
Using data points with statistical functions, configure the time for archive record change using different times (for example, not all at midnight) in order to avoid a load peak.
You select the times for backup and deletion of data in the same way.
- Compression: Clicking on this check box activates the automatic compression of completed archive records in level 1 (considering the time offset). Activate also the second check box Compression level 2 (can only be activated, if first check box is active) so that the level 2 is taken into account for each automatic compression. Furthermore, you have to configure the maximum number of archive records remaining in level 1. Defining the value 0 means no compression in level 2. By default, both check boxes are deactivated (for more information on compression, see also History DB - Compression of archives).
-
Storage : X data records remain on the disk for correction values. Here you define the number that is not backed up. Default value is 0, that is, no archive
record will be backed up.
If you set the value to "1", the correction values can only be written for the current record or for the last unsaved record.
For example,. if an annual archive is changed on 1.1. and swapped out on 2.1., the correction values of the whole year can be entered only from 1.1. until 2.1. Later changes will be lost because of the automatic deletion.
- Deletion : There are X data records left on the hard disk. Here you define the number of data records on the disk (default value 10, that is, the 10 youngest archive records remain after each change of an archive record. Older, not swapped-in records, will be deleted).
Example
The upper field storage contains two and the field deletion contains ten. There are ten data records on the disk. Eight records of the ten will be saved on a tape. TheOK, Cancel, ApplyandHelpbuttons work as described under Size.
Statistics
You cannot make statistical statements in the tab until you have created a data point with archive. It is recommended to assign the data points to an archive that is already running otherwise the DP will be assigned to the default archive (ValueArchive_0000). Note that some internal data points have already been assigned to the Archive 0.
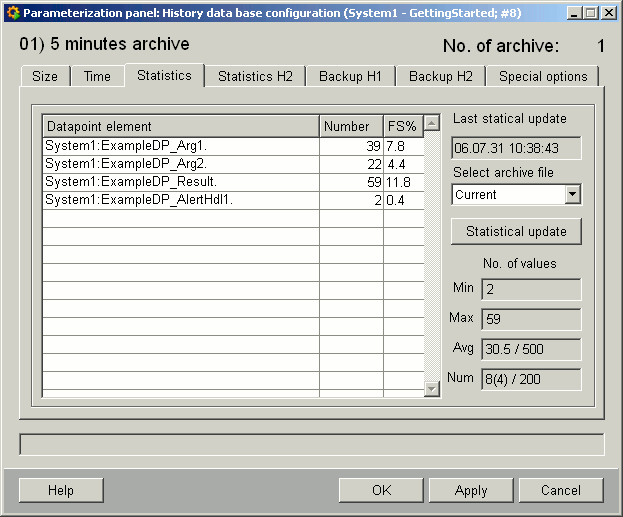
This panel provides information about the statistics of your archive records. Click on Statistical update to obtain the most current information.
The table shows the entries of the current archive record as follows:
- Data point element: Specifies the name of the DPEs of this archive.
- Number: Contains the number of values of the data point elements.
- FS%: Displays the proportion of data point values in the fill level of the archive records (14 values are 0,6 % of 5000 possible values). If a compressed archive record is selected, this function will not be supported (the column FS% is invisible after an update with the Statistical update button).
With a right click on a data point element, it is possible to automatically open the element inside a PARA panel to check the configuration of the element.
The panel also includes the following information:
- Last statistical update : The text field indicates the time of the last update.
- Select archive file : Shows a list of the archive files. Thus, you can analyze what DPEs produced most data and, possibly, triggered a change of file. Allows to analyze older HDB files.
- Statistical update: This button updates the entries.
- No. of values : indicates how high the average fill level for the individual data records is in the archive.
- Min: The minimum fill level for the displayed data points.
- Max: The maximum fill level for the displayed data points.
- Avg : The average fill level of the displayed archive (on the average 26.3 values of 5000 are in the archive).
- Num: The amount of data points of the total number of data points. The first figure is the amount of the active data points that have been assigned to an archive (active data point means that you have selected the check box Store original value in the archiving config for the data point). The second figure is the number of data points that are currently archived and the third figure represents the maximum number of data points that can be archived in the current archive. The number 4(4)/100 means, for example, that 4 archive sets have been assigned to the archive, 4 are currently archived and a maximum of 100 data points can be archived in this archive.
Note that the number of the active data points which are assigned to an archive is not shown when the archive is full.
If you choose an already completed archive set, the total number of data points (that could have been archived) will not be shown.
Backup H1
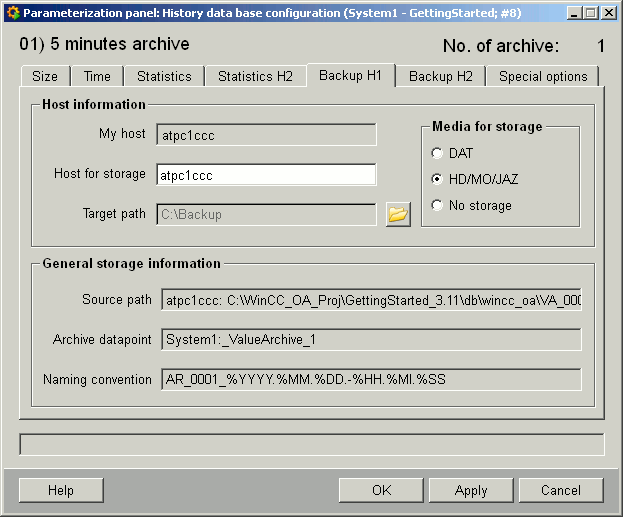
This tab allows to define the settings for the backup. My host is the current computer on which the data has been collected and the host for storage is a (possibly different) computer on which the data is to be backed up.
If you set a host with a remote user interface to be the host for the backup, the host1 (My host) will be displayed for HD/MO/JAZ with the running archive_client.ctl script.
- Select the medium for your data backup.
- Click in the input field of the host to specify a destination computer. The following dialog is opened (only in case of DAT backup):
Figure 9. Dialog for host name 
- Enter the required host in the upper field (see Configuring backups).
- Click the button, next to the target path field (HD/MO/JAZ), to open another dialog
- Specify the destination path or destination file (for example, (D:/Project_backup or manually the appropriate tape in case of DAT tapes).
The target path (directory) for the swap-out of the Value Archive should not be the same as the target path of the onlinebackup.
The following general security information is displayed:
- the source path of your data
- Associated archive data point (it has automatically been created when the archive has been created)
- the naming convention (the archive with name and date)
The OK, Cancel, Apply and Help buttons function as described under Size.
Backup H2
For the backup of RAIMA alerts or HDB in a redundant project, access to the shared network drive is required.
This tab is only active and visible with redundant systems. It is identical to the Backup H1 tab and shows the data of the host on the right side. In case of redundant projects, you can backup the data of the 2 computers differently. When you back up redundant systems, consider the following:
- Both hosts are backed up in case of automatic backup (if this has been configured).
- With manual backup, only one host will be backed up.
Archive records are swapped in for both computers (see Swap out/backup archives). A view of the archives and statuses is also provided in the system overview panel in redundant projects.
Depending on the tape, the DAT initialization takes approximately 1 - 1 1/2 hours (for a 90 minute tape). The initialization is not required if the tape is new (backup automatically rewinds and creates a new archive). It is, however, required if the tape already contains some data that is to be deleted. Otherwise the existing data is appended (for details on the buttons see Swap out/backup archives).
Special options
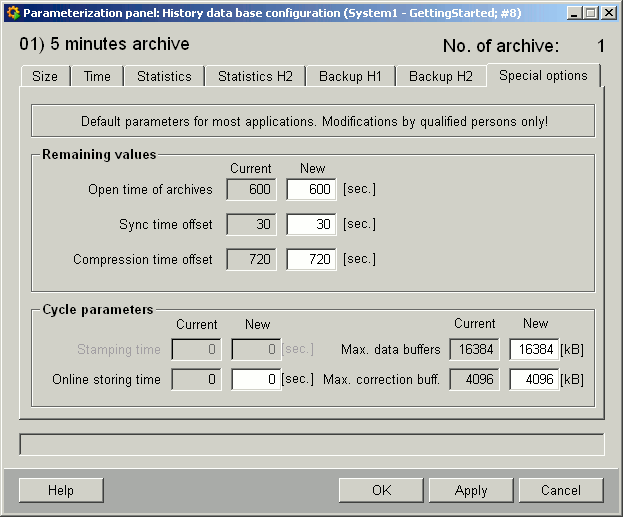
In this tab, you define the parameters for the open time of archives, the compression time offset and so on.
- Click in the input field "open time of archives".
- The Open time dialog is opened.
- Enter the required value.
The other remaining value parameters are defined in the same way. Note that the values become actually active only the next time the archive record will be changed. Definition of terms:
- Open time of archives (default 600 seconds) during a change of an archive record.
- Sync time offset (default 30 seconds) corresponds to the duration of the file change. An archive created at a particular time is actually written only after the time offset.
- Compression time offset (default 3600 seconds) defines how many seconds after the archive record change, the automatic compression starts. The time offset for the automatic compression should last at least 30 seconds (minimum value).
The value for compression time offset must be greater than the sync time offset.
The following settings are possible for the cycle parameters:
- Stamping time : Time during which the data will be buffered. If the value is high, the database is quick but less secure (default 1) (future option not implemented in the current version).
- Online storing time : Time during which the archive is stopped for the online backup (default 60).
- Max. data buffers : how many KB serve as buffer (main memory) if new files are written at the same time when data is swapped out or the archive record is changed (default 16384 kB, 0 = unlimited). These values become active after a confirmation (Apply) (without change of an archive record!).
- Max. correction buff. : How many KB should be left for correction values as buffer (main memory), (default 4096 kB, 0 = unlimited). These values become active after confirmation (Apply) (without change of an archive record).
When the hard disk is full, the system tries to create a new archive record cyclically. No values can be written during this time. As soon as space is available again, an archive record will be created and can be written again. The information panel provides the status of the archive record change.


