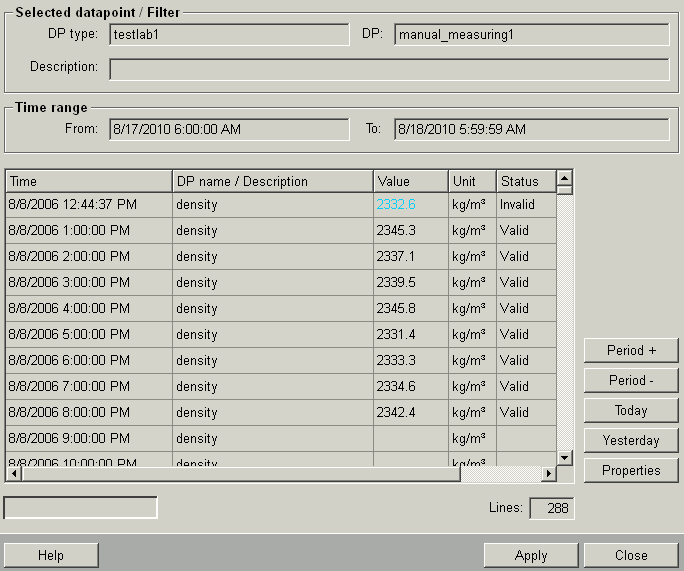
Laboratory values panel
When you have confirmed your settings in the " Laboratory Values settings " panel, the requested data shows in the Laboratory Values panel.
In the top section of the panel, you can see the settings that you made earlier in the panel. The data point displays next to the data point type with a Description for the data point beneath it. Below this field, the Time range selected for the data readout displays.

The table displays the values as read from the database as follows:
-
Time: Time values from compression level C1 of the data point concerned.
-
DP name/Description: Contains either the data point name or DPE description.
-
Value: Values read from the database or values to be written to the database.
You cannot save values if the position after the decimal point is zero.
You can enter values retroactively up until the first deleted or defective file change.
-
Unit: Shows any units that have been specified in the data point element of the data point concerned.
-
Status:Invalid values (status "invalid") show in light blue (in addition to the text).
-
User:List s the user who was logged in when the laboratory value has been set.
If one of the values is invalid (status "invalid"), it shows in light blue (in addition to the text). By clicking on a row in the Value column, you can enter a new value or change the existing value (the background color of the cell changes to white).
On the right side, the panel provides the following controls:
Close: Closes the Panel.
Period + : Displays the next period.
Period -: Displays the previous period.
Today: Displays the period "today" (up to 0:00 depending on the time the shift started, see Centralized Settings).
Yesterday: Displays the period "yesterday" (up to 0:00 depending on the time the shift started).
Properties: Opens the Laboratory Values Settings panel.
Apply: Saves the edited data in the database.
Help: Opens this page of the Online Help.
| Example | Description |
|---|---|
| Working with laboratory values | In this example, you create data point types using manual input and make subsequent changes to the values. |


