KPI Wizard - Associate
In the "Associate" panel you can:
-
add new instances for a KPI definition as well as the content for the KPI instance parameters.
-
specify the content of the KPI instance parameters either based on context or by using literal values.
-
select how a KPI is triggered: manually, when a parameter value is changed, or when the timed function callback is triggered. You can find a preview for KPIs in the Inspect panel.
The different parts of the associate panel as well as how to use the associate panel are described in more detail in the following.
The following figure shows the Associate panel.
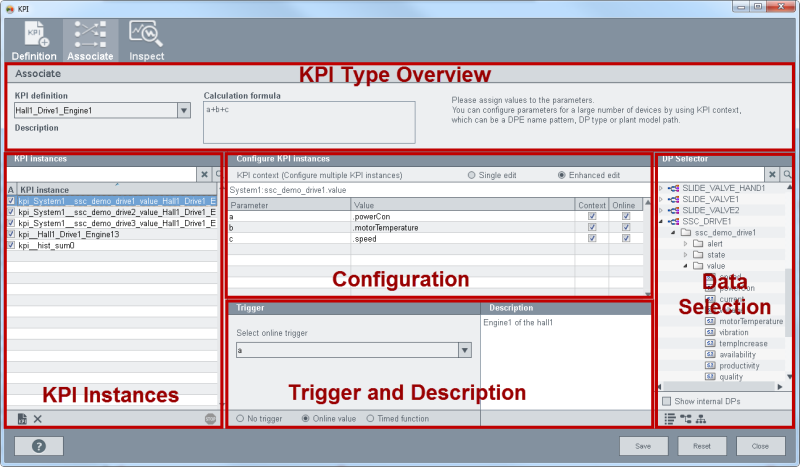
The panel consists of the following parts: KPI Type Overview, KPI Instances, Configuration, Trigger and Description as well as Data selection.
If several elements are selected in a table (for example, in the table above), you can change the elements - for example, enable/disable a check box by using shift and left-click.
KPI Type Overview
The KPI Type Overview shows the KPI types and the calculation formulas that were created for a specific KPI type in the Definition panel. The KPI Type Overview consists of the following two parts: KPI definition combo box and Calculation formula.
KPI definition combo box:
Select the KPI definition type that was created using the Definition panel, from the combo box. When you select a type, the calculation formula for the specific type is shown in the calculation formula window and the parameters and their values in their specific windows.

If a new KPI definition is necessary for existing KPI instances, the new definition can be applied at run time to the SmartSCADA.ctc CTRL Manager by enabling, disabling and re-enabling the KPI instance. A restart of the CTRL manager is not necessary.
Calculation formula:
The calculation formula that you specified using the Definition panel, is shown in the window. The formula can be either a formula such as "a*b" or an invocation of a function that is defined in the wincc_oa_path/SmartSCADA_3.15/scripts/libs/SmartSCADA/kpi/kpiFunctions.ctl. For more information on the calculation formulas, see chapter KPI Wizard - Definition.

KPI Instances
The KPI Instances list gives you an overview of already existing KPI instances. Here you can select an existing instance or start creating a new instance.
The table shows the instance name and the current state (enabled or disabled) of the KPI instance. Enabled KPI instances are calculated at runtime. This means that the connection to the data points is built and the check boxes in the KPI associate panel are checked.
The system checks every 30 seconds if licenses for KPIs are available. If licenses are available, KPI instances that were deactivated due to license reasons, are reactivated. The 30 seconds break also allows you to reactivate certain selected KPI instances.
You can
-
enable an instance by selecting an already existing instance and by checking a check box or
-
create a new one by saving the KPI instance configuration.
KPI instances,
-
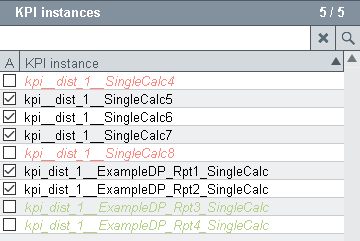
that are deactivated due to calculation errors are displayed in red italics.
- that are deactivated due to license reasons are shown in green italics.
-
that are deactivated by the user are shown in default black.
- that are active are shown in default black.
For further editing tasks you can select a instance by clicking it. Multiple selections are possible via CTRL and left-click.
You can delete an instance by using the x sign located below the panel. All currently selected KPI instances are deleted.
 Resets the selection meaning that the data
in the "Configure KPI instances" table is deleted.

If a very high number of KPI instances that contain a reference to another KPI instance are deleted, it may occur that all KPIs are not deleted. In this case, deactivate the KPI instances and delete again.
Configuration
The configuration part of the panel comprises the KPI context search and the radio buttons Single edit and Enhanced edit.

KPI context
The KPI context allows you to specify a search context. The context can be a name pattern, a DP type or a plant model path. See chapter KPI Wizard - Associate - Configuration - KPI Context for detailed information about KPI context.
Single edit and enhanced edit
The single and enhance edit modes allow you to edit the KPI instances. See chapter KPI Wizard - Associate - Configuration - Single/Enhanced edit for detailed information. The Context and Online check boxes are described in the chapter KPI Wizard - Associate - Configuration - Single/Enhanced edit.
When you edit a context-based KPI, all your changes are applied to KPI Instances that match the shown context. To edit a single KPI Instance, use the single edit mode.
Trigger and Description
Trigger
Via the trigger option you can select how a KPI instance calculation is triggered.
-
no trigger - KPI calculation should be triggered manually
-
when a parameter value is changed
-
when the timed function callback is triggered.
Online value:

The combo box allows selecting a parameter that triggers the KPI calculation. A value change of this specific parameter triggers the KPI. You can also select the wildcard trigger. The wildcard trigger uses all online parameters of the selected KPI for triggering the calculation of the KPI.
Timed function:

The KPI calculation is triggered according to the selected timed Function option:
-
ssc_tf_15Min: every 15 minutes
-
ssc_tf_1Day: every Day
-
ssc_tf_1Hour: every Hour
-
ssc_tf_1Week: every week.
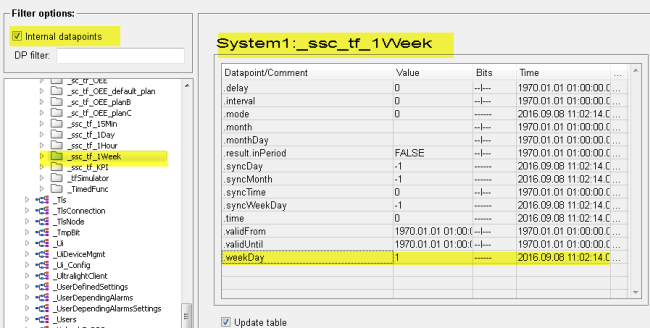
Note that the function is triggered according to the set day in the internal timedFunction data point (see figure below). The index starts at 1 (Monday):
-
ssc_tf_KPI: every 5 seconds
The KPI is calculated when the timed function is triggered.
ssc_kpi_histSum:
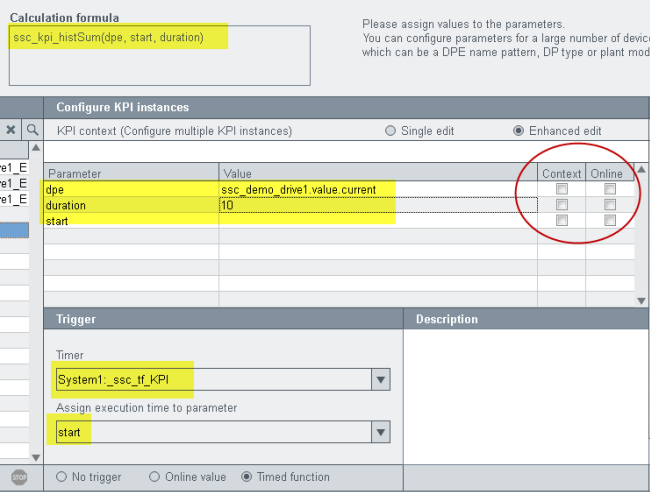
Calculates a historical sum. The formula can be used for a KPI. By using the formula, you can use a time value in a function. This time value is dynamic. You can, for example, calculate a sum for the duration of "Duration" seconds in the past (history) every 5 seconds. See figure below.
Assign a timed Function "timer" to parameter only if a KPI formula contains a time parameter! For an example, see figure below.
Do not check the check box "Online" since the historical values should be calculated. The "Online" check box specifies that the current online value of the data point is used for the calculation. In this example the content is not used and left empty. See figure below.
Description:
You can add a description for the KPI instance in the "Description" field. Click the text to edit an existing description or click the empty window to add a description.
Data Selection and Preview
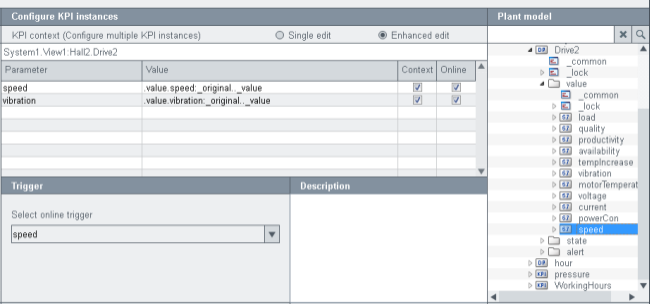
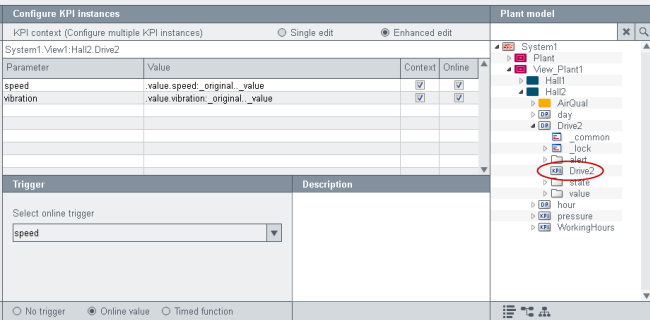
On the right side in the Data Selection area you can search for data points or plant monitor nodes. Furthermore, you can preview your KPI instances. You can switch between the views: PARA, plant monitor and preview - see the figures below. On the left you can see the PARA module in the KPI Associate panel. In the second figure you can see the plant model in the KPI Associate panel and in the third figure, the KPI instance preview.


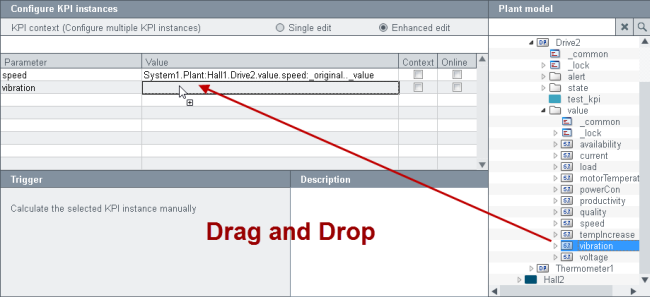
You can assign process values to KPI parameters either by typing or by dragging and dropping from the PARA, and plant monitor trees. The next figure shows you how you can drag and drop a data point to the value field from the data selection (plant model tree). In the same way you can drag drop a data point type.
The PARA and plant model views allow you to search for data points and nodes.
Note that KPIs are saved as data points in a WinCC OA system. You can find them via the DP selector by searching the data point type "SSC_KPI_instance". For KPIs that are created by using the plant model view and the KPI context, KPI data points are created for the plant model view as well, and shown in the plant model view (see figures below).
