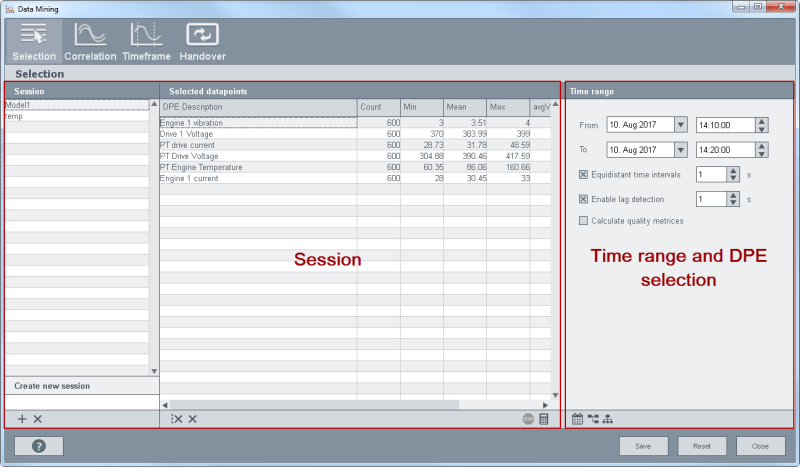
Data mining Wizard - Selection
In the "Selection" panel you can:
-
create new sessions with datapoints
-
use already existing session configurations
The different parts of the "Selection" panel as well as how to use the Session panel are described in more detail in the following.

The "Selection" panel consists of the following parts: Session, Time rangeandDPE selection.
Session
Here you can select a saved session or create a new session by entering the name of the session into the "from" field and pressing enter or by using the + button. You can also press Enter after typing a name in order to create a new session. The session configuration can be later handed over to the classification wizard via the Handover panel. In the classification wizard you can then create a random forest model.
 Deletes all DPEs
from the table.
 Deletes the
selected DPE from the table.
 The first button stops the
calculation of "Count", "Min", "Mean", "Max",
"avgValInt", "MAE" and "NMAE" - see below) and the calculator symbol recalculates
the Count, Min, Mean, Max, avgValInt, MAE and NMAE - see the description below.
The temp session may not be deleted in the Selection panel.
Time range and DPE selection
Select the time range and the datapoint elements for the session. Note that you have
to select datapoint elements. Switch the view from time range to PARA or
plant model view by using the buttons  at the bottom of
the panel.
Note that in case of high number of datapoint values (approx. over 500.000), the response time of the system is slower. Thus, the time required for a calculation is longer.
Note that if no values exist for the time that you select, the time is set to the earliest point in time where values for the datapoint exist!
The data of the datapoints is shown in the columns "Count", "Min", "Mean", "Max", "avgValInt", MAE and NMAE :
-
Count: shows the number of the datapoint values within the time range.
-
Min: shows the minimum value.
-
Mean: shows the average of all values within the time range.
-
Max: shows the maximum value.
-
avgValInt: shows the average value in the interval. NOTE: the average is only calculated when you check the "Calculate quality metrices" check box.
-
MAE: shows the mean absolute error. NOTE: the mean absolute error is only calculated when you check the "Calculate quality metrices" check box.
-
NMAE: shows the normalized mean absolute error. NOTE: the normalized mean absolute error is only calculated when you check the "Calculate quality metrices" check box. NMAE option normalizes MAE by the range of available values.
Equidistant time intervals
The "Equidistant time intervals" check box allows you to generate values every [specified] second. This is useful if the different datapoints under "Selected DPEs" do not contain the same amount of DPE values. In other words, the "count" is not same for all the "Selected DPEs". By using the spin button you can generate values at intervals of the specified [time]. Depending on the specified time, values are, for example, generated every 2 seconds.
Enable lag Detection
Specifies the maximum time (delay) between all values of different datapoints. Several values are often needed to calculate a correlation. By using the "Enable lag Detection" you can specify the maximum time that is allowed between all values of different datapoints. In other words between the two values when two data points are compared.
The "Equidistant time intervals" and "Enable lag detection" can only be set to a meaningful number of seconds meaning at least 1 second.
The check box "Calculate quality metrices" is only shown after the "Equidistant time intervals" check box is enabled.
Calculate quality metrices
The "Calculate quality metrices" check box is shown when you check box "Equidistant time intervals". When you check the "Calculate quality metrices" check box, the average value in the interval (argValInt), the mean absolute error (MAE) and the normalized mean absolute error (NMAE) are calculated.
Note that when you check the check box "Calculate quality metrices", the time that the system requires to execute the calculation is longer.
Buttons

The button "Save", "Reset" and "Close" are available in all panels of the Data mining wizard.
Save
Saves the current settings of a panel.
Reset
Resets a value to the current original value or resets a setting to the current original setting. In order to reset a value to the original value, answer the question "Do you want to save the changes" with "No".
Close
Closes the wizard.
