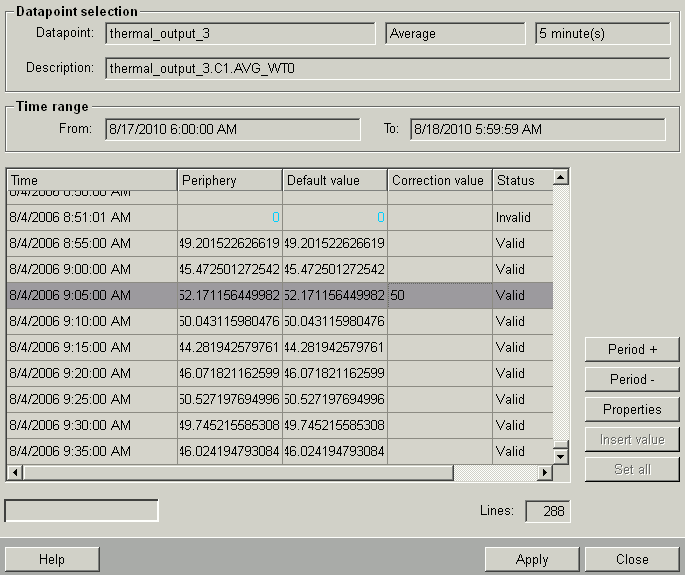
Correction values panel
When you have confirmed your settings in the correction values settings panel, the requested data shows in the Correction Values panel.
In the top section of the panel, you can see the settings that you made earlier. The selected interval and function displayed next to the data point together with, beneath it, a Description for the data point. Below this section, the time interval chosen for the data readout shows.

The table displays the values as read from the database as follows:
Time: The time of the archive entry
Periphery: The readings from the peripheral device at the listed time (corresponds to "_original_value").
Default value (corresponds to the "_online.._value"): The values that might have been specified for this time by default value handling
Correction value (corresponds to the "_offline.._value"): The values specified for this time by correction value handling (_offline.._corr has been set to TRUE). The correction value is write-only.
Status : An invalid value (status "invalid") shows in light blue (in addition to the text).
User:Indicates the user who was logged in when the correction value has been set in the database.
In the bottom left corner is a field displaying the data download status. Below the bottom right corner of the table, a field on the right shows how many lines have been read.
If during retrieving data for a data point of the type AC, the system discovers that values have not been saved for all the expected times, it automatically adds values to the table to make it easier for the user to set a value for these times. For data points not of the type AC, the user can simply add new values using the Insert value button.
On the right side, the panel provides the following controls:
Close: C loses the panel.
Period +:D isplays the next period.
Period -:D isplays the previous period.
Properties:O pens the "Correction Values Settings" panel.
Insert value: Allows you to insert new values for data points without compression. A panel opens in which you enter a value and a time. This data is added to the table after clicking on OK and shown in the table dimmed until saved in the database.
Set all:Allows you to set values simultaneously for at least one selected row. In the child panel, you enter the value that you want to set for all selected rows. Use CTRL + left mouse button to make a multiple selection in the table or drag your selection by holding down the left mouse button.
Apply: Saves the edited data in the database.
Help: Opens this page of the Online Help.
| Example | Description |
|---|---|
| Working with correction values | In this example, you create data points with archives and make subsequent changes to the values. |


