Open the License Information panel via the License
Information button in the Project Administration panel
or the WinCC OAconsole.
The filebased operations tab of the License Information panel allows you to activate, deactivate or update a license filebased. The chapters
under Offline License Operations describe how to activate a license filebased - see the first step Step 1 - Create Request (Offline PC)
. The same steps apply to all license operations, meaning to deactivation and update.
Figure 1. License Information Panel - File-based Operations
Note:
Online/Offline PC of a step (see below) indicates where the operation should be performed.
Step 1 - Create Request (Offline PC)
Select the container or create a new container by clicking the
+ button. Then create a request by clicking the
Create request button.
Save the request file (.RAC) to, for example, a USB stick and transfer the file to a
PC with Internet access. By default, the request file is saved in the directory
Windows: C:/Users/<userName>/license and Linux:
$HOME/license.
Note:
If you change the default directory, note that the
directory must be writable.
A license can be activated, deactivated, updated and re-hosted offline. The four steps under Step 2 - License Operations describe how to do that. The offline process
is divided into steps on an offline computer and steps on an online computer.
Note:
You must execute all 4 steps of the Offline License Operations in order to activate, deactivate, update or re-host a license.
Step 3 - Import update and create a receipt (Offline PC)
Select the update file (.RAU). By default, the .RAU file is saved in the Windows:
C:/Users/<userName>/license and Linux:
$HOME/license directory.
Import the update file .RAU.
Figure 4. Import the Update File (.RAU)
Select the directory the receipt file should be saved in. By default, the receipt file is saved in the Windows: C:/Users/<userName>/license and Linux:
$HOME/license directory.
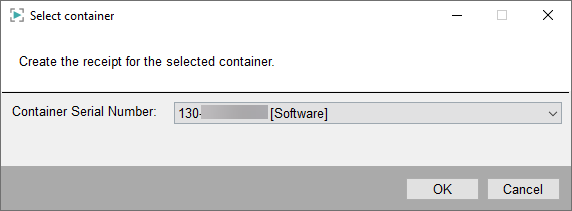
Click the Import Update button and select the same container that you used earlier in Step
1 when creating the request:
Figure 5. Select Container for the Receipt
 in the Project Administration panel
or the WinCC OAconsole.
in the Project Administration panel
or the WinCC OAconsole.