Using the scheduler

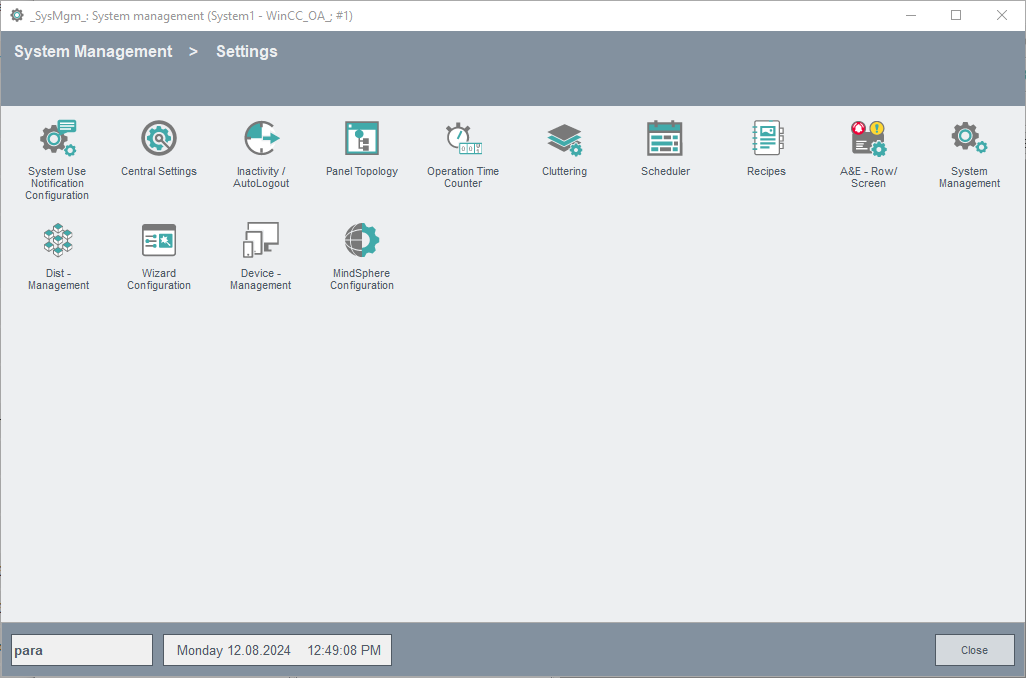
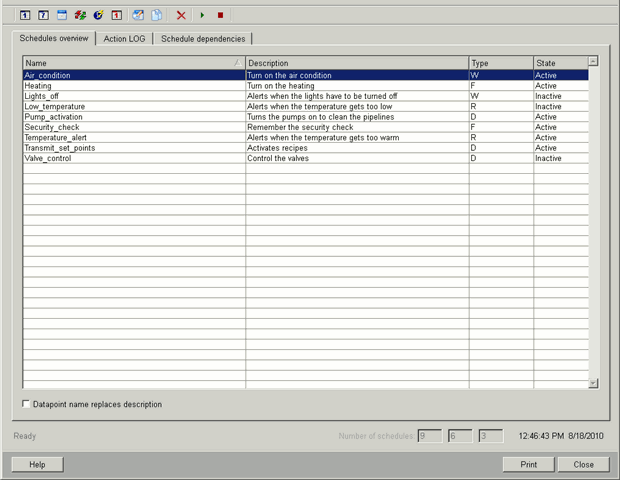
Open the scheduler by clicking on the Scheduler button. The main panel is displayed as shown in the following figure:

The scheduler main view consists of three sections:
-
Menu and toolbar for preparing new schedules and special days and several other features like edit, delete start and stop
-
Main view with several tabs and
-
Status bar on the very bottom
The tab "pages" in the center of the main panel contains three different tabs. The Schedules overview tab, the Action LOG tab and the Schedule dependencies tab that visualizes possibly existing dependencies between schedules.
A status line at the bottom provides useful information regarding loading state and total number of available schedules.
The tabs and buttons are described in detail in the following paragraphs.
![]() Close scheduler. Closes the
scheduler panel.
Close scheduler. Closes the
scheduler panel.
![]() New day schedule: Opens
the configuration window for a day schedule. The day schedule provides the possibility
to define the same event pattern for one or each day of the week. The day schedule
feature is described in detail in the chapter day schedule.
New day schedule: Opens
the configuration window for a day schedule. The day schedule provides the possibility
to define the same event pattern for one or each day of the week. The day schedule
feature is described in detail in the chapter day schedule.
![]() New week schedule: Opens
the configuration window for a week schedule. The week schedule provides the possibility
to define a specific event pattern for each day of the week. See chapter week schedule for
details.
New week schedule: Opens
the configuration window for a week schedule. The week schedule provides the possibility
to define a specific event pattern for each day of the week. See chapter week schedule for
details.
![]() New free schedule: Opens
the configuration window for a free schedule. This features allows to use the predefined
features like single event, periodic events, a date/time list or the advanced
configuration panel. This schedule type is capable of fulfilling all timing operations
provided by the timedFunc() easily through an intuitive GUI. See chapter free schedule for
more information.
New free schedule: Opens
the configuration window for a free schedule. This features allows to use the predefined
features like single event, periodic events, a date/time list or the advanced
configuration panel. This schedule type is capable of fulfilling all timing operations
provided by the timedFunc() easily through an intuitive GUI. See chapter free schedule for
more information.
![]() New reaction program:
Opens the configuration window for a reaction program. Allows to define a value
condition to trigger reactions. See chapter reaction program for more information.
New reaction program:
Opens the configuration window for a reaction program. Allows to define a value
condition to trigger reactions. See chapter reaction program for more information.
![]() Fast configuration of
Pop-up: Opens the configuration window for a timed pop-up reminder function. As
well as a pop-up can be defined as action in all other schedules or programs this
feature provides the possibility to quick configure a timed reminder pop-up. See chapter
pop-up
configuration for more information.
Fast configuration of
Pop-up: Opens the configuration window for a timed pop-up reminder function. As
well as a pop-up can be defined as action in all other schedules or programs this
feature provides the possibility to quick configure a timed reminder pop-up. See chapter
pop-up
configuration for more information.
![]() Configure special days:
Opens the configuration window for special days. A special day list can be defined
allowing to handle holidays etc. exceptional. Out of this list a user-defined number of
schedule specific configurations can be deduced. So each schedule can be provided with
it’s own list of exceptional special days. See the chapter special days for
details.
Configure special days:
Opens the configuration window for special days. A special day list can be defined
allowing to handle holidays etc. exceptional. Out of this list a user-defined number of
schedule specific configurations can be deduced. So each schedule can be provided with
it’s own list of exceptional special days. See the chapter special days for
details.
![]() Edit selected schedule:
Opens the configuration window according to the schedule type.
Edit selected schedule:
Opens the configuration window according to the schedule type.
![]() Copy selected schedule:
Copies the selected schedule into a new one.
Copy selected schedule:
Copies the selected schedule into a new one.
![]() Delete selected
schedule: Deletes the selected schedule. To delete a schedule you have to
deactivate it first.
Delete selected
schedule: Deletes the selected schedule. To delete a schedule you have to
deactivate it first.
![]() Activate selected
schedule: Activates the selected schedule.
Activate selected
schedule: Activates the selected schedule.
![]() Deactivate selected
schedule: Deactivates the selected schedule. Deactivated schedules can be
readily configured but do not commit any actions.
Deactivate selected
schedule: Deactivates the selected schedule. Deactivated schedules can be
readily configured but do not commit any actions.
The schedules overview presents the name, description, type and current state of all schedules configured in the system. For each new schedule a unique name has to be specified and it must not be longer than 64 characters. Once you have defined a name the same name cannot be used a second time. An additional description text can be used to clarify its purpose. Descriptions are multilingual - that means you can define one in each language of the current project. The types are displayed by the characters D (day), W (week), F (free) and R (reaction). The column state contains the current activation state (active or inactive) of the schedule.
Additionally in the column Description schedules description text can be replaced by the schedules datapoint name. The actions and all the information required by the scheduler are saved in scheduler specific datapoints (for more information on the scheduler data points, see chapter Scheduler details). Thus the schedule can be identified within the data point framework at any time.

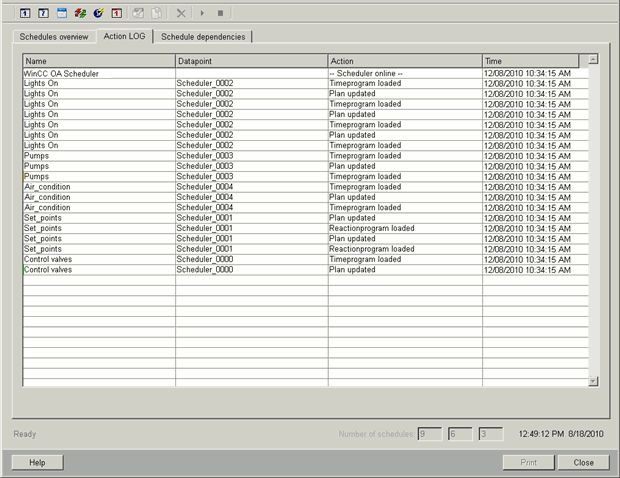
In the Action LOG tab all actions that are executed by the scheduler are listed. Starting and stopping of the runtime script as well as the operation of different schedules are visualized. This tab is also used to check if the scheduled tasks are executed as configured. Within the tab the schedule's Name, Datapoint, the Actions made by the different schedules as well as the Time when an action is executed are displayed.
The number of the shown log rows is limited to 1000 entries. The entries are limited using a panel global variable SC_MAX_NUM_OF_LOG in the init script of the panel. The number can be changed.
The debug flags DEBUG and DEBUGDETAIL can be used for log outputs. To do so, set the option -dbg DEBUG or -dbg DEBUGDETAILin the manager properties of the scheduler CTRL manager.

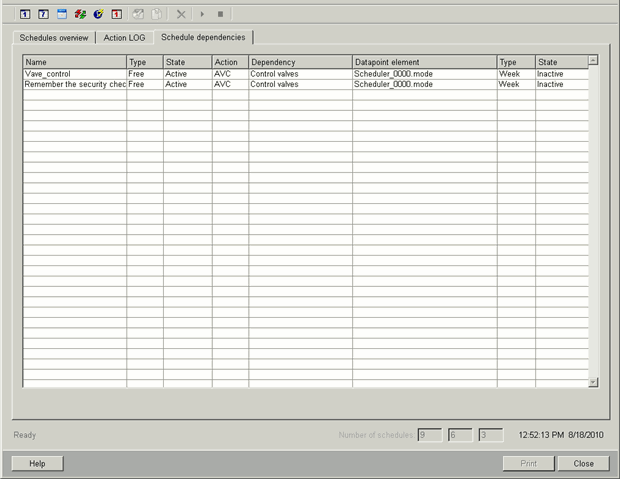
The third tab displays all dependencies between schedules. If you build a chain of schedules an entry will be made into this tab. For providing you with all information needed the tab is split into two areas:
The schedule that utilizes another schedule: (columns 1-4)
-
Name : The name of the schedule
-
Type : Type of the schedule
-
State : Active or inactive
-
Action : The action that is done (AVC, DPE or REACT)
-
AVC (Additional value condition):Theschedule contains an additional data point value condition
-
DPE: There is a scheduler datapoint of another schedule in the DPE list of the regarded schedule (created via actions definition)
-
REACT: The schedule contains a reaction program (executing of script, showing of Popup etc.)
-
The schedule that is used: (columns 5-8)
-
Dependency : Which schedule is used by another schedule
-
Datapointelement: The datapoint element of the used schedule
-
Type : Shows the type of the schedule that is used
-
State : Active or inactive
If you want to create a dependency between two schedules you have to choose the data point of this schedule (a datapoint you want to create a dependency with) in the configuration panel (e.g. in the day schedule). The datapoint is chosen since the actions and all information needed by the created schedules are saved in scheduler datapoints. This means that in order to create a dependency between two schedules you have to choose a datapoint of a schedule. The schedule datapoints are of type _Sc (see chapter scheduler details). After choosing the datapoint and saving the schedule in the configuration panel you can see the dependency in the Schedule dependencies view. The datapoint is chosen from the Additional Value Condition view. Note that you can only choose the mode element of the schedule datapoints.
