Text field
Input and output fields are areas with a shadowed edge for entering text through the keyboard during operation or for displaying a text by the program. Input and output fields exist for setting or changing datapoints or for displaying datapoint values or messages. Input fields pass user input to WinCC OA, output fields display values while input/output fields let the user change displayed values. Integers and real numbers with any general character strings (any sequence of letters, numbers or special characters) are available as text formats. In addition, coded input display is possible using the Password format. In this case, the text letters appear as a row of stars ("****") similar to password fields. The currently set font will be used here. In addition, the time format can be displayed in different variants. For some data types (integers, floats, time, exponential), there are the properties Leading Zeros and Empty if Zero.
Control of editing
You can edit only entries that conform to the defined format. So neither floats can be written in the integer text field nor strings to an integer field. Scripts are only executed for appropriate formats. The following characters are allowed:
- string: all characters
- integer: "+", "-" 0-9
- float: "+", "-", "." 0-9, e (for exponential functions)
- exponential
- password: all characters
- time: YYYY.MM.DD HH:MM:SS.mmm, local date and time, local date, local time and customized times
For further information see Format string.
Time Format
The time format is only applied after an explicit assignment. e.g.:
If the textfield is changed afterwards, the time format will not be applied again. The previous behaviour (e.g.: reformatting of the date/time formats yyyy.mm.dd hh:mmss.cc or hh:mmss.cc, an invalid date-time format resulting in 01.01.1970 ...) does not apply anymore. In those cases the textfield displays the exact string entered by the user and ignores the date/time-format.
TEXTFIELD1.text = makeTime(2021, 1, 1, 13, 27, 33)Min/Max
The settings for min and max are retained as long as the datatype of the textfield does not change.
When the text field has a different datatype in the panel than the the first format setting from Control, min/max settings made before this change are ignored.

How to create a text field
- Click on the text-field tool
 .
. - Click in the panel work area. Define the size.
- Open the Property Sheet
- Enter the object name beside (Name).
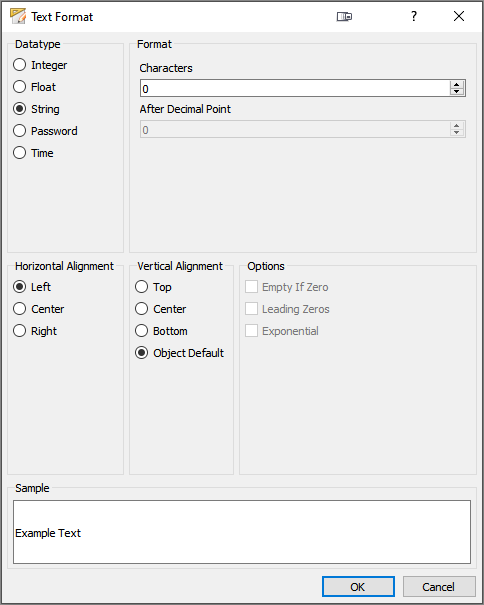
- In the Property Sheet click in the box next to Text format and specify your text format in the dialog box that opens.

Here you can specify the following properties:
- Datatype : Integer, String, Float or Password.
- Characters: The maximum number of characters.
- Number of decimal places and places before the decimal point
- Horizontal Alignment: Left, Right or Centered
- Vertical Alignment: Top, Center, Bottom or Object Default.
- For integer and float numbers you can choose the options Empty if Zero (the number will not be shown if it only contains zeros), Leading Zeros and Exponential (only with float values).
The preview window in the lower portion of the text format panel reflects the chosen options.
- You can edit the text font in the Property Sheet by selecting the Font option.
- You can allow an empty text for
numeric values by setting this option to TRUE in the property
editor.
Attention:If allowEmptyNumeric is activated and "minMaxNumeric" used, the textField remains empty or remains with the last valid value input if a new value is not in the valid range of minMaxNumeric.
Password Example
In the following example, a script sets a datapoint variable to the numerical value 1 when the password "PassWD1"" is entered. The format of the text field is "Password" (see the text format window above) so that the password cannot be read when entered. The getValue() function writes the data entered in the text field to the variable "passw". When you specify this script for the event "Command", the password will be written to the variable when pressing ENTER). If the entry matches the correct password, the data point variable "ExampleDP_Arg1.:_original.._value" will be set to 1 by using the dpSet() function, otherwise it will be set to zero.
main()
{
  string passw;
  getValue("", "text", passw);
  if (passw == "PassWD1"}
  dpSet("ExampleDP_Arg1.:_original.._value", 1);
  else
  dpSet("ExampleDP_Arg1.:_original.._value", 0);
}
Notes
For text field functions see chapter Control Graphics/Text field functions.
