The expert panel allows you to optimize specific import settings that should be required
only rarely.
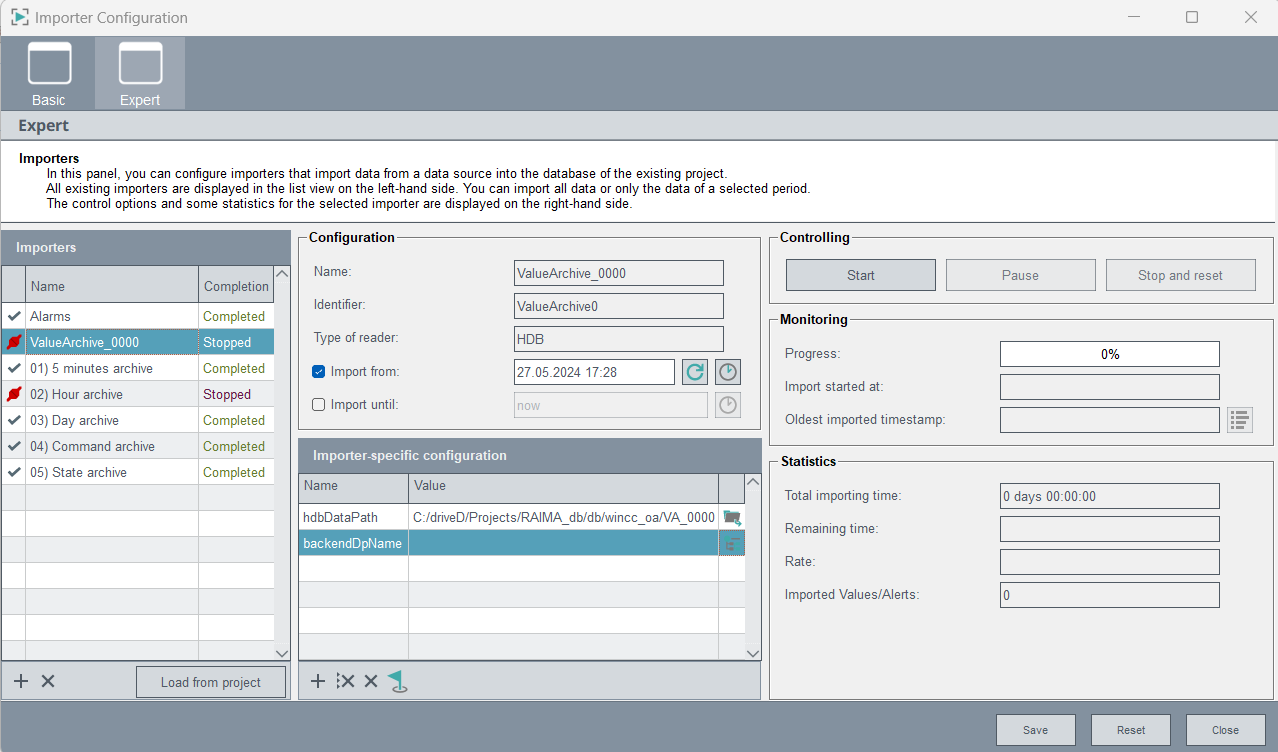
Open the Importer panel via System Management > Database > NGA Importer and then open the Expert panel.
Figure 1. NGA Importer - Expert Panel
CAUTION: Normal NGA archiving and the NGA importer
use a common resource, i.e. they share the bandwidth.
Importers
Figure 2. Importers
The importer is activated with the check box Automatic import on
project start in the panel NGA
Migration. With the activation, a list of importers for the previous
configuration is created and the import is automatically started. One importer
is added for each Value Archive and one is added for the alert history of RAIMA
DB. The internal data points for the Value Archives still have to exist for this
purpose (they are not deleted by project upgrade). Also the conversion of the
archive configs from Value Archive to NGA has to be performed before (see
chapter Conversion Settings). The Load from
project button can be used when a project has already been
converted from HDB to NGA project but the historical data has not been imported
yet.
Note: Note that the configuration data of the value
archives (names, segment duration, retention) will also be taken over to the
configuration of the newly created NGA groups.
Select an importer (archive) from the table on the left side. The
configuration is applied to the selected importer. Data shown on the right
of the panel always applies to the importer selected on the left side of the
panel.
With the + sign you can add new importers.
Figure 3. Add Importer
You can select your data source from the following options:
HDB (importing values from Value Archive): For a
new importer you need to add the path to the data under
Importer specific configuration. For HDB you
have to set the option hdbDataPath in the
importer-specific section (see further below) to refer to the location
of the value archive files, e.g. WinCC OA_proj/db/wincc_oa/VA_[number].
Raima (Importing alerts from the Raima database):
For Raima you have to set the option
raimaDataPath in the importer-specific
section (see further below) to refer to the location of the Raima
alerts, e.g. - WinCC OA_proj/db/wincc_oa/.
NextGenArchiver (for the NextGenArchiver you must
configure from which backend you want to read the data.): For
NextGenArchiver you have to select the backend the data should be read
from using the option backendDpName in the
importer-specific section (see further below).
Note: You can run several importers (archives)
concurrently but you must select and start the importers individually, one
after the other.
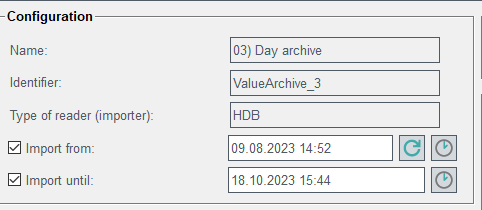
Configuration
Figure 4. Configuration
The name of the selected archive is shown and you can
change it.
Identifier shows the unique identifier of an archive.
When you create an importer, you must specify a unique identifier.
Type of reader (importer) can be either HDB (value
archive) or Raima for alerts.
You can import data from...until. By default, everything
is imported (all available data of the selected value archive / RAIMA alert DB).
You can limit the amount of data by selecting a date. If you select a point in
time when data is not available, data will not be returned until the point in
time when data is available. You can reset the time by using the button. The time is reset to the first value in the archive.
Importer-specific configuration
Figure 5. Importer specific configuration
For a new importer you need to add the path to the data under Importer
specific configuration. Select an Importer
(see the beginning of this chapter) and add the path to the location of the data.
CAUTION: If the location of the HDB/Raima data to be
imported is not WinCC OA_proj/db/wincc_oa/ of the running
project, delete the *.taf and vista.log files before starting the import. However,
do not delete these files if they are located in the WinCC OA_proj/db/wincc_oa/ directory.
hdbDataPath: value archive data - WinCC OA_proj/db/wincc_oa/VA_[number]
raimaDataPath: alert data - WinCC OA_proj/db/wincc_oa/
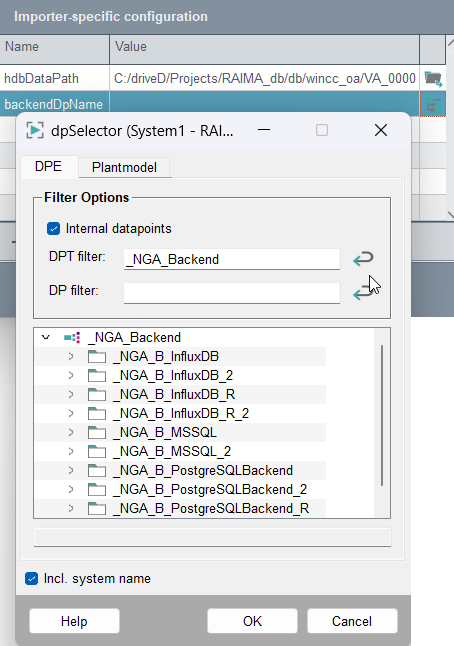
backendDpName: NextGenArchiver backend - select an
_NGA_Backend datapoint. The importer will read data from this backend
represented by this internal datapoint:
Figure 6. backendDpName
Note: We recommend selecting a read-only backend to avoid
unnecessary write operations.
Note: ETM recommends specifying the start and end time for
the NextGenArchiver backend Importer as precisely as possible. The import
from 1970 to today takes a very long time due to a current technical
limitation, as the data must be retrieved from the source backend until the
start time.
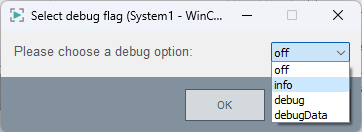
Select a debug option to add a logger level to the import-specific
configuration:
Figure 7. Debug Option
loggerLevel =
info corresponds to the default setting -
only the most important information about the importer is
logged.
debug adds debug output to the project
log.
debugData adds debug output and the
imported data is included in the project log.
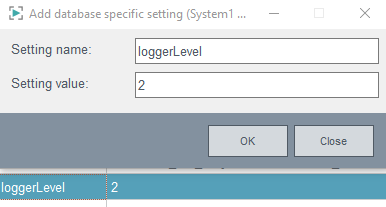
Note: The log file can become very large - in this
case there is the entry "*** step over 151143 bytes of
WCCOAtoolNGAImporter_ValueArchive1.log *** in the log viewer. If you
want to see all information, open the log from the
project/log directory.
Figure 8. Database-specific setting - loggerLevel
useDpNames = "true"|"false" default "true". Specifies whether the import is done
on DP name basis ("true") or on DP ID basis ("false"). The option can be used
like loggerLevel above.
The following options can be used to import historical data of
source DPEs for other target DPEs:
dpeNameMapFilePath: Absolute path to the mapping
file. The DPE
Mapping functionality is only used, if this option is
given.
importOnlyDpeNameMap = "true"|"false": Specifies
how historical data of DPEs not mentioned in the mapping file should be
handled. The option importOnlyDpeNameMap = "true" means
that all DPEs not mentioned in the mapping file will be ignored by the
importer. Using importOnlyDpeNameMap = "false" applies
the historical data also for DPEs that are not mentioned in the mapping
file to the original DPE. The configuration option is optional,
importOnlyDpeNameMap = "false" is used by
default.
Note: The options must be defined for every Importer,
which should use the DPE mapping.
DPE Mapping
The feature allows you to specify a mapping file of DPE names to be used for
importing historical data (values and alarms) of specified source DPEs to other
target DPEs. The feature is enabled by specifying the path to the mapping file using
the option dpeNameMapFilePath.
Mapping File
The mapping file specifies for which target DPE the historical data of a given source
DPE should be imported.
The file is a .csv file (Comma-separated values), its columns must be separated by
"," (comma). Every line defines one mapping from source to
target DPE in the format <source DPE>,<target DPE>.
The DPE names always have to include the system name. Additionally, empty lines can
be added to the file for increased readability.
It is also possible to leave the target DPE empty, for example by using
System1:TestStructure01.value, (without value after
"," (comma)) which leads to not-imported historical data of the
source DPE.
Restriction: Every source DPE must only be
specified once in the file.
Important: The data types of the source and target
DPEs must be the same, it is not possible to map an uint-DPE to an int-DPE for
example.
Pause - Interrupt the data import with the option to
resume the data import. If you restart the import later, it will resume
from the point where it was paused.
Stop and reset - Interrupt the data import without the
possibility of resuming the data import . It resets the whole import and
if you restart the import later, it starts from the beginning.
Import started at shows the time when the current
importer was started.
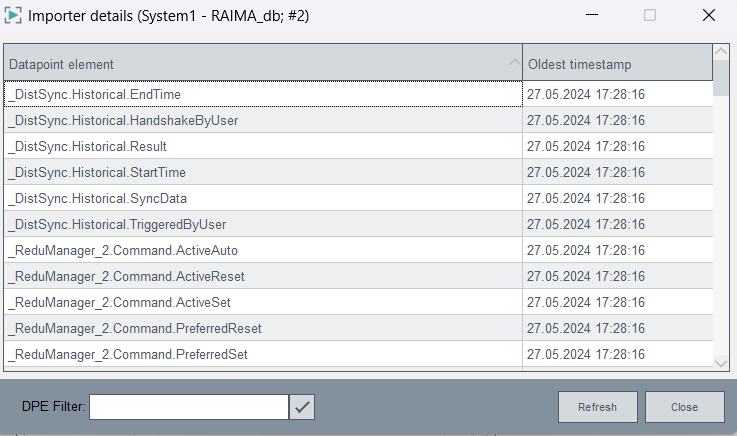
Oldest imported timestamp - The data is imported from the
oldest data to the newest data. For example, while you are importing data, you
can already query the oldest data. You must filter data using a data point name.
This entry gives the oldest timestamp when the data for this data point was
imported (one data point is archived per archive).
Figure 12. Oldest imported timestamps
You can either filter by data points by selecting a data point, or show the
oldest imported timestamp if you do not select a data point.
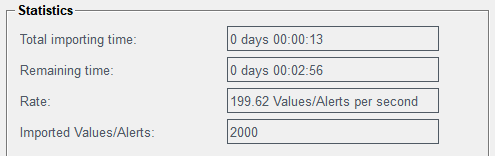
Statistics
Figure 13. Statistics
Total importing time specifies the cumulative total time
how long it takes to import the data.
Remaining time is the estimated time left of the selected
import time.
Rate of speed that the data is written. The rate is
specified via the option Max Values/Alerts per
second.
Imported Values/Alerts contains the number of the values
and alerts imported to the database.

 CAUTION: Normal NGA archiving and the NGA importer use a common resource, i.e. they share the bandwidth.
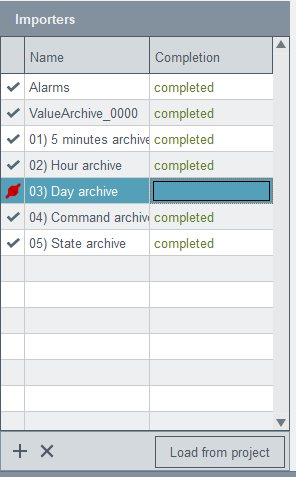

 button. The time is reset to the first value in the archive.
 Note: We recommend selecting a read-only backend to avoid unnecessary write operations.Note: ETM recommends specifying the start and end time for the NextGenArchiver backend Importer as precisely as possible. The import from 1970 to today takes a very long time due to a current technical limitation, as the data must be retrieved from the source backend until the start time.